This page created 24 Jun 2019
Version note: Applies to Gedcom Publisher 1
This article describes how to create User Styles in order to modify the appearance of an e-book produced with Gedcom Publisher. This is an advanced technique, and may well be ignored by users not inclined to dabble in such things. Other articles in my Gedcom Publisher Section cover other topics about using the program.
|
Topics Included in this Article |
|
| Getting a basic understanding of how HTML and styles work together | |
| Other HTML elements used by Gedcom Publisher | |
| The mechanics of creating a User Style | |
| Using the Element Inspector to identify User Style Selector and Parameters | |
| Applying a User Style to a class | |
Electronic books, or e-books, such as those created by Gedcom Publisher, are written in HTML, and the display is styled by Cascading Style Sheets (CSS), as webpages are. But while browsers used to display webpages are now pretty mature and the designer of a webpage can be reasonably confident that a reader will see what was intended, the same is not true of e-readers. There is currently considerable variation between various e-readers in how many CSS styles are interpreted and used in the display of an e-book, if at all. One reader may display an effect intended by the book's designer, another may display the some element differently, or simply ignore the style. Some CSS techniques that work well in webpages simply do not work or produce poor results in current e-readers.
In developing Gedcom Publisher John Cardinal has gone to pains to use styles and techniques that will display the resulting e-book as intended with most e-readers. Advanced users of his website authoring programs Second Site and GedSite will notice that the sections of standard Stylesheets which allow users to easily adjust the appearance of many elements of their websites are not available in Gedcom Publisher. This was done purposefully, to avoid inviting users to make changes in styles that may produce unexpected results.
Nevertheless, for those users daring, or foolish, enough to dabble in stylesheets, Gedcom Publisher does allow users to create User Styles to override the standard styles produced by the program. Users doing so should be aware of the risks that their e-book may not display as intended on some, or even any, current e-reader.
In this article we will explore some basic concepts of HTML and CSS as they are used in Gedcom Publisher, then explore how to create User Styles to modify how the e-books created with the program are displayed.
The methods in this article apply equally to websites created with John's website authoring programs, Second Site and GedSite. The main difference is that for websites one uses a browser instead of an e-book reader to view and examine the output. Browsers often use the term "Inspect Element" instead of just "Inspect" as shown in the screenshots, and all references to the "book" would of course be to the "website."
Before getting into the details of Custom Styles, it may be helpful to review a few basic concepts about how HTML and Cascading Style Sheets (CSS) work together to produce the display of an e-book.
The content of an HTML document, whether a webpage or an e-book, is contained in HTML "elements." The two basic types of elements used by most such documents are:
A basic HTML document might contain these elements:
Note that each element begins with an opening tag, such as <h1>, and ends with a closing tag, such as </h1>. This is true for most, but not all HTML elements.
The resulting document would look like this:
Note that each of these elements is placed on its own line, or if they were longer, their own paragraph. That is true for these basic elements, but not for all elements as we will see a bit further along.
The way the contents of each element is displayed is controlled by styles, which are contained in "stylesheets." The styles can specify a variety of attributes of how the contents will be displayed. As examples, they may specify the font-family (serif or sans-serief), font-weight (normal or bold), font-style (normal or Italic), and font color. They may also specify background colors, borders, and spaces between this and other elements, among many other characteristics.
For our purposes it is useful to think of three layers of stylesheets:
In this system, when there are any conflicts between the styles specified in one layer and another, generally the lower-listed ones prevail. This cascading effect, where the styles specified in one layer flow through to the next unless modified, is the basis for the term "cascading style sheets."
So far we have described only HTML elements and styles. When a style is applied to an element, it applies to all elements of that type in the document. There is another important component of this system: "classes." Classes are not pre-defined, but are defined by the author, or authoring program, that created the document. They may also have styles defined for them by the author or program.
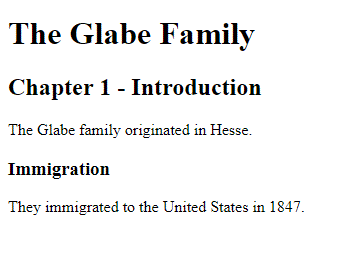
Most HTML elements can have classes assigned to them. When a specific element is assigned a class, the styles of that class may add additional styles or override the styles that were assigned to that element. For example, Gedcom Publisher enters the name of a person at the top of the Person Entry for that person in an h2 element, but assigns a special class, like this:
If the class "gs-sn" has different styles assigned than the element h2, the styles assigned to the class control. Gedcom Publisher, and John's web-authoring programs, provide classes such as this liberally. In some cases the styles are specified for the class in order to provide special styling to that content. In others there are no standard styles specified by the program but the classes are available for use in User Styles if the user prefers some different treatment than provided by default.
Now that we have described some very basic HTML elements and introduced how classes modify how they are displayed, the next section describes some other HTML elements that are commonly used in John's programs
The first two elements are used to divide sections of content and apply specific styles to them:
Both of these must have styles applied in the Authoring system's or the User's stylesheets to produce any desired styling. Generally that is done by the use of classes. Here is an example of how <span>...</span> tags with a class assigned can be used to provide distinctive styling to the lifespan of a person:
Here the class "gs-pe-lifespan" may contain styles to output the lifespan in fonts different than those used for other text that appears in the same paragraph.
In this case the link is to footnote number 15. The part in red is the address of the footnote in this document. This element has default styling provided by the user agent stylesheet, and may have additional styling specified by authoring program and/or a User Style.
The resulting list would look like this:
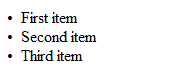
This is an "unordered list," meaning the list items are not numbered. An "ordered list," one that has each item numbered, would be defined by the tags <ol>...</ol> tags instead of the <ul>...</ul> tags shown here. List tags have default styling provided by the user agent stylesheet, and may have additional styling specified by authoring program and/or a User Style. Unordered lists can appear without the bullet points in front by the use of styles.
The resulting table would look something like this:

Table tags have default styling provided by the user agent stylesheet, and may have additional styling specified by authoring program and/or a User Style.
These are the HTML elements most often found in an e-book produced by Gedcom Publisher when attempting to create User Styles. There is one other tag, that while not involved in styling should be mentioned only to avoid confusion when it is found when examining the output of Gedcom Publisher as described in the following sections:
The <br> tag takes no styling.
User Styles are created in the User Styles section of the Gedcom Publisher user interface. When we first open that section we see an empty field that will contain a list of all our User Style items. To add a User Style item we click the + drop-down at the bottom left of that field, just as we do when we add items to other lists in Gedcom Publisher:

The "list" that appears has only one item on it, User Style. When we choose that we see the Add User Style Item:
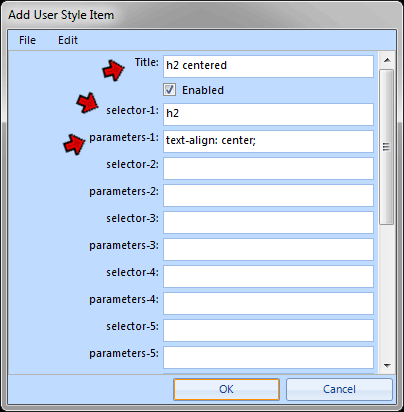
Like most Items in Gedcom Publisher, it has a Title field, which is used only to identify this Item in the list of Items. We enter some text which describes the purpose of the User Styles we will create in this Item. If we are creating a number of User Styles, putting related styles in one Item and creating a new item for unrelated styles makes it easier to find and edit them in the future. Meaningful Titles make it easier later to identify the purpose of styles in that Item.
Below the Title field are pairs of Selector and Parameter fields. There are a total of ten of them, of which only five visible in the screenshot. For each User Style we create we enter in one of these pairs:
The combination of a Selector and Parameter(s) is commonly called a "style."
In this example we are creating a User Style to center all h2 level elements in the book. So we enter "h2" in the first Selector field, and the style "text-align: center; in the Parameter field. When we are done we close the Add User Style Item window and re-make the book to see the result.
While the mechanics of the process described here are simple, in practice the process is more difficult because we seldom know which Selector and Parameters will achieve our intended goal. The next section describes how to use the Element Inspector as an aid to learning which Selector and Parameters to use.
In the example in the preceding section we assumed we knew what element we wanted to modify, and what style we should use to accomplish a goal. But in practice we seldom know that. Instead, we generally find in reviewing our book some part of the content that we want to have displayed differently, and seek to find a Selector and Parameters that will accomplish that change.
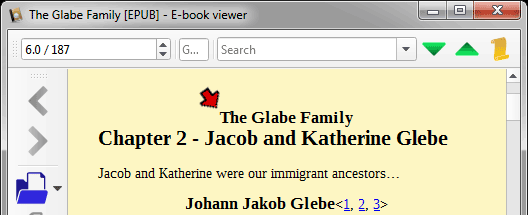
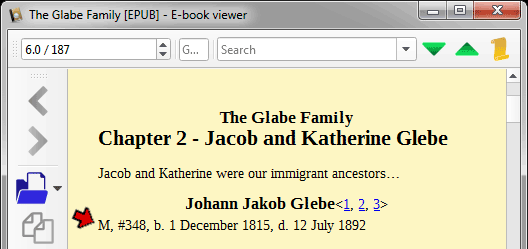
In this section we approach the same case as above, but starting from a more realistic point. Here we decide we would like to have the title of each chapter centered, rather than left-justified as is the default arrangement. In the screenshot below we see a chapter in our book as displayed in calibre (I have not tested other e-book viewer for the PC, so do not know whether any others have similar features):
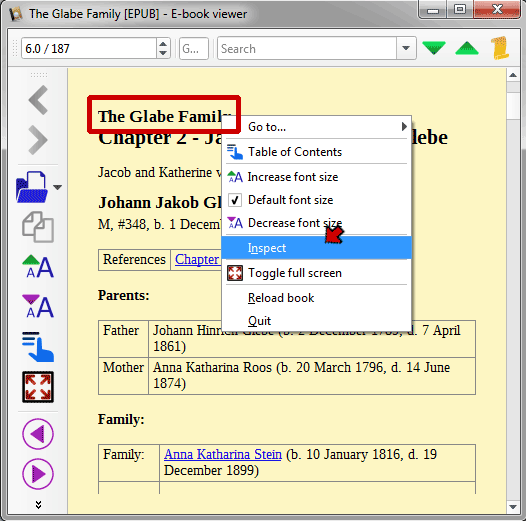
We see the chapter title, outlined in red here, is left-justified. We right-click on that line and choose Inspect from the menu that appears.
When we chose the Inspect command the Inspect Book Code window opens:
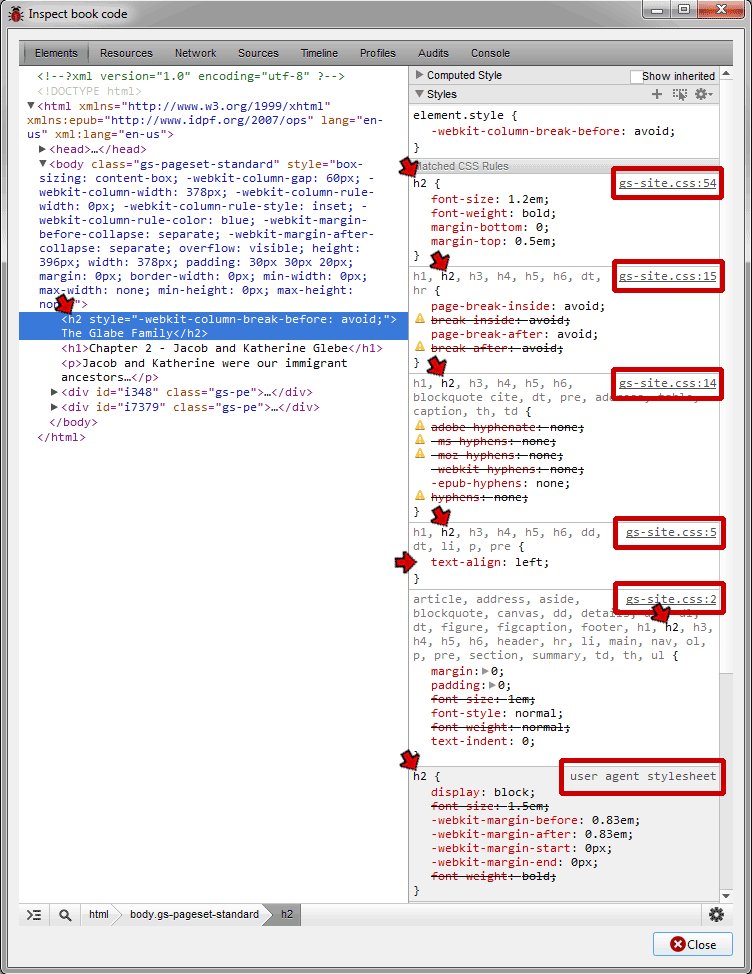
This large window contains several helpful items. On the left is the actual source code for the page of the e-book we are viewing, arranged in a way that is helpful in understanding why the content is displayed as it is. First, note the small black triangles in front of some sections. Those pointed to the right indicate that other lines below them are hidden. Clicking one of them causes the hidden lines to be expanded into view, and the black triangle then points downward.
Next, note the lines highlighted in blue. They are the code for the book title that we had pointed to when we right-clicked to open this screen. Not visible in this sceenshot is the fact that if we hover the mouse cursor over that section the corresponding content in the book is highlighted, which is very helpful in locating the code that controls a particular bit of content.
Looking still at the blue highlighted section, note that the title text is in an h2 HTML element, between two <h2>...</h2> tags (we can ignore the style="-webkit...avoid;" attribute; it controls pagination and not the styling of the text we are concerned about here).
Turning now to the right side of this window is a display of all the styles that control how our h2 element is displayed. The series of blocks there conveys the "cascading" part of Cascading Style Sheets. Starting with the bottom block, we see the styles that the "user agent" – that is calibre – has assigned to the h2 element. Working up from that we can see the various styles assigned to the h2 element by the stylesheet produced by Gedcom Publisher. The origin of the styles in each box as noted by the text in the red boxes. That text tells us that these styles come from a stylesheet with a filename of gs-site.css, and the line number of that file. Note that the higher boxes are from later lines in the stylesheet, and when there are conflicts the later styles supercede earlier ones. Styles in the lower boxes which have been superseded have a line drawn through the indicating they no longer apply.
Finally, note in the third block from the bottom, the style which causes the h2 element to be left-justified using the attribute: "text-align: left;"
Now that we can see the styles that control the display of the line we are focused on, we will see how the Inspector can help us define a new style to accomplish our goal, to center the book title on this page.
We know that we want to modify the styles for the h2 element, and we know that the style involved uses a text-align attribute. To discover exactly what style we need we focus in the second box, the one that deals with h2 alone. We click in the lower left corner of that box, in front of the single "}" bracket, and a new line appears. We start typing the name of the attribute we want to use, and after we type "te" a list of possible attribute appears, as shown here:
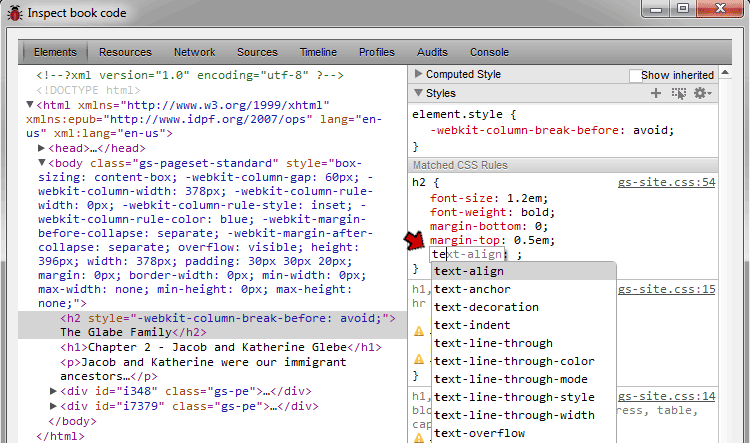
We select "text-align" from the list by clicking on it. Next we need to find the right value for this attribute. We use the tab key to move to the value field (do not try to use the mouse, it doesn't work). We need to guess the right value, which isn't very difficult in this case. We type in the letter "c" for center, and the only permissible value starting with that letter appears:
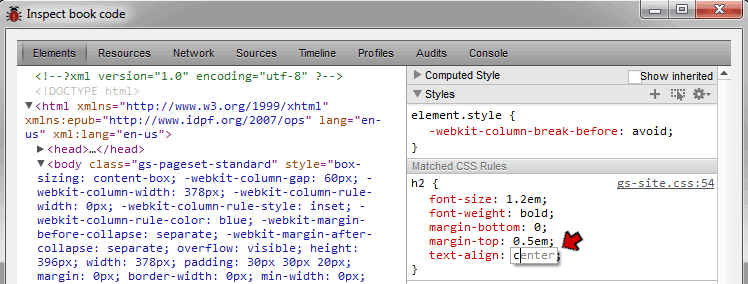
We again use the tab key to exit that field which adds the new style temporarily to the viewer. We can now look at the book itself to see if we have achieved the desire effect:
Having verified that a selector of "h2" and the style "text-align center;" will achieve our goal we can create a User Style with those values, as described in the section above.
Some cautions are in order about applying User Styles to HTML elements alone. In this case, the chapter title was in an h2 element, with no class assigned. So the only way to re-style was to apply the new style to h2. But h2 is used in many locations in the book, and because there is no class available to limit where our User Style applies our style will be applied everywhere in the book that h2 is used. When using a User Style like this one should review the whole book to be sure that the change doesn't create undesired results in other parts of the book.
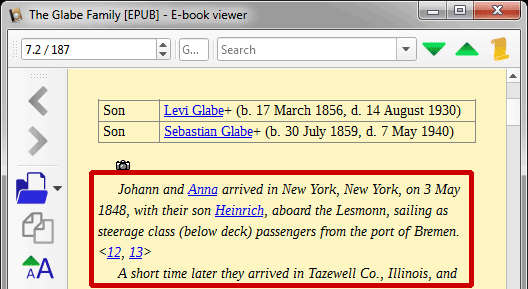
In the example above we used a User Style to modify the display of an HTML element. Now we see how applying a User Style to a class can change a more limited portion of the book. Suppose we want to change the font used to display the narrative portion of the Person Entry, a part of which is enclosed in the red box below.

We right-click on a part of that text and choose Inspect, as in the example above, which opens the Inspect Book Code window:
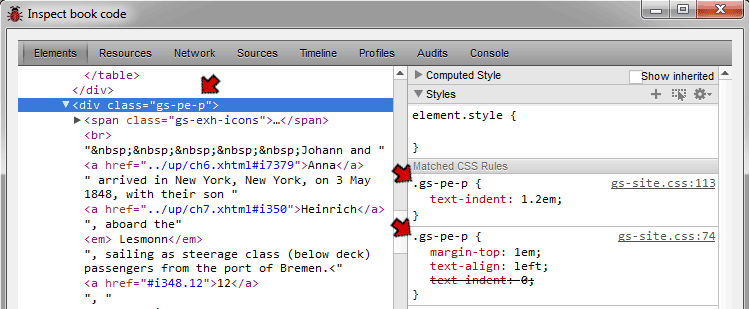
Here, looking at the left side of this window, we find that the entire narrative section is enclosed in a <div> element, and that element is assigned the class "gs-pe-p." There are many <div> elements used in the book, and we only want to change the font in those <div> elements which enclose the narratives. The fact that they have a unique class assigned enables us to do that.
Our intent is to modify the font used to display the narrative. Let's say we want it to be in Italics. To find the required style we click in front of the "}" in the lower left corner of the second box, and assuming a font attribute would start with the word "font" we type that in, and a list of attributes beginning with those letters appears. If the required style name is not obvious we can look at the other styles listed in the Inspect window for clues. If that fails, a Google search including the term "css" and the effect we want is generally informative.
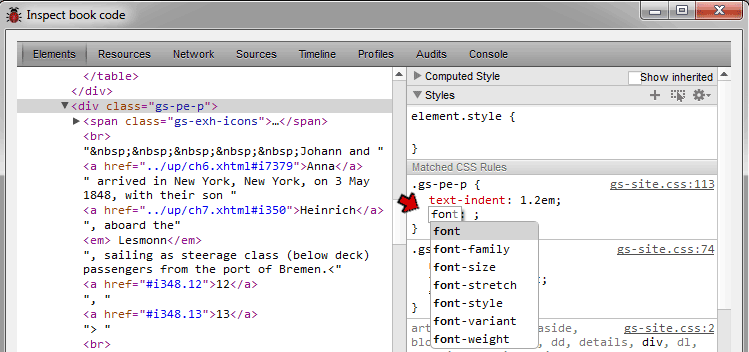
Since we want to change the style of the font to Italic, we click on "font-style" to select it. Then as above we tab to the next field to enter the value, and start typing "italic" and that value quickly appears. We click on that, then tab out of the field. Looking now at the book we see the result we intended:
Having verified that our proposed style accomplishes what we intended, we now create the User Style to implement it. In the User Styles section of the Gedcom Publisher interface we add a new User Style Item:
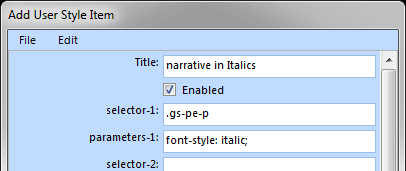
In this Item we enter a Title to remind us the purpose of the User Style. In a Selector field we enter the name of the class, remembering to include the leading period. In the associated Parameters field we enter the style we created in the Inspector window. To avoid typing errors, we actually use the keyboard copy and paste commands to transfer these items from the Inspect window.
We then re-make the book and review to be sure our User Style had indeed had the effect we intended.
In this example we made use of a class which already had some styles applied to it by the program. But John has included classes for many elements in the book for which no specific styles are applied by the program. We can make use of these classes just like those which are styled by the program, but the procedure for testing them with the Inspector is a bit different. For example, suppose we want to change the fonts used to display the summary line after the subject's name at the beginning of the Person Entries:
We right-click on a part of that text and choose Inspect as before, which opens the Inspect Book Code window:

Here, looking at the left side of this window, we find that the entire summary section is enclosed in a <div> element, and that element is assigned the class "gs-pe-gil." But when we look at the right side of the window we find that the "gs-pe-gil" class is not listed. That means the program has not assigned any styles to that class. So in this case we enter our trial style in the first box, as shown partly completed in the screenshot. After verifying that it works as intended we create a User Style as above. The only difference is we have to type in the name of the class in the Selector field instead of copying it from the Inspect window.
This article presents the basics of creating User Styles in Gedcom Publisher. There are a number of more advanced methods that can be applied to create modifications to specific content, but they are beyond the scope of this article. For further assistance I recommend posting to the Gedcom Publisher email list on Googlegroups.
| ReigelRidge Home | Terry's Tips Home | Contact Terry |
Copyright 2000- by Terry Reigel