This page updated 19 Apr 2013
Version note: Applies to Second Site 6 & 7
Tag Groups allow one to separate the Tags that are output in Person Pages into groups, which then can be separated from other groups of Tags to be placed in a specific sequence, and if desired formatted differently. This article describes that feature and offers some suggestions for its use. Other articles in my Second Site Section cover other topics about customizing your site.
Topics Included in this Article |
|
| Understanding the concept of Tag Groups | |
| Creating additional Groups | |
| Modifying the appearance of a Tag Group | |
| Using Tag Groups to create links to other pages | |
Tag Groups are one of the many items that are controlled in the Pages > Person Entry section. The functions of that section are described in my Customizing Your Site article.
Conceptually, Tag Groups are relatively simple. Using them involves these steps:
Two or more groups of Tags are created, with the Tags in each Group selected based on their Tag Types.
The Groups are sequenced, along with other items on the Person Pages, in the order they are to appear in the Person Pages.
Each Group is assigned a "Type," which controls the formatting of the Tags in that Group. The main Group is assigned the Type "Body," and those Tags are formatted according to the Format selected at the top of the Pages > Person Entry section. The other groups may also be of the Body type, or may assigned one of the three types of "Panels" – Narrative, List, or Table. The output of Tags in these Groups is formatted in one of these three styles, and the Panel itself may be sized, positioned, and styled as desired.
By default, all Tags are in the Body group, will be displayed according to the Format selected for the site, and will appear in Sort Date sequence.
Also by default, there is a BMDB First group, composed of all Tags in the Birth, Marriage, Death and Burial groups. It is also of the Body Type. This Group is by default inactive, unless your sdf file was imported from an older version of Second Site, and in that version had the "BMDB First" option selected.
To group the BMDB Tags at the beginning of each person's section, as is done by default in TMG's Journal reports, you simply make the BMDB Group active. In the Pages > Person Entry section click in the box in front of the BMDB First group, as shown in the screenshot below.
One appealing application for Tag Groups would be to collect all census Tags in a separate group, and present them in a table format to separate them from other Tags. Help contains some suggestions that should assist in doing this. To access that Help page, open a Tag Group and press F1.
The following sections describe some other applications for the Tag Group feature, and suggest some ways to modify the formatting of Groups. The two sections that follow provide detailed instructions, using as an example a Narrative Panel to highlight research notes included for various people in a narrative-style site. Following that is a second example illustrating how Tag Groups can be used to provide a special section providing links to a Custom Page for specific people.
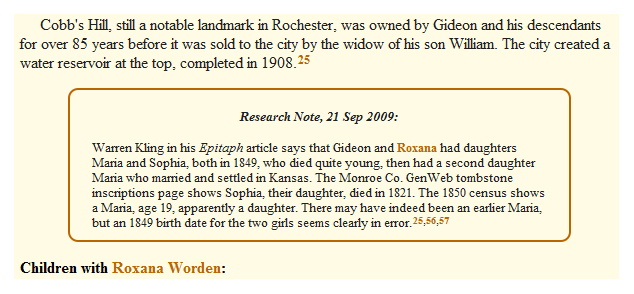
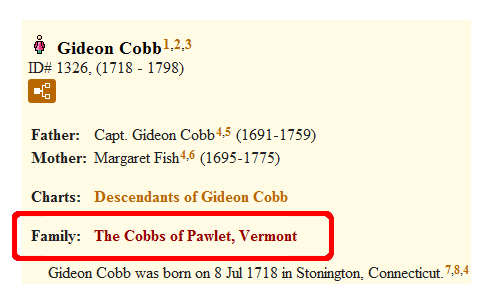
In the first example the objective is to create a boxed note as seen here:
To create a new Group for special treatment of some Tags, go to the Pages > Person Entry section and click the Add button. This opens the Choose Item Type screen, from which you choose Tag Group and click OK.
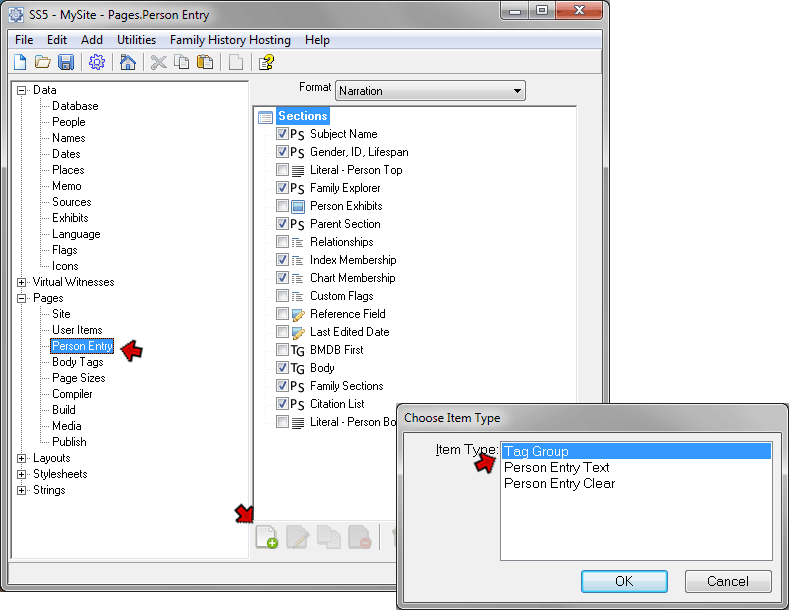
This opens the Edit Tag Groups screen: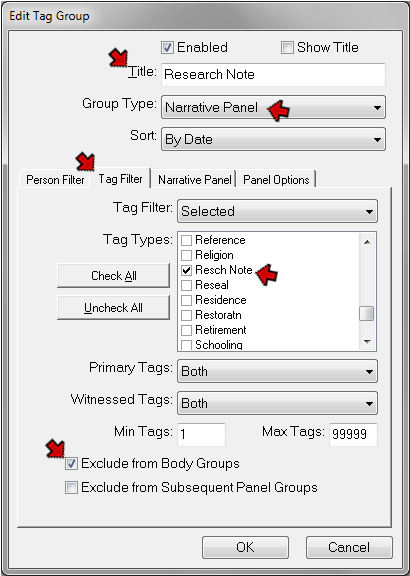
In this example I am creating a separate Group for my Research Notes Tag. I use that Tag to record significant concerns about the data for a particular person, such as questions about whether I have the correct parents for that person. I want that Tag to appear after all other Tags, and to have the text set off in a box from the other text about the person.
On the Edit Tag Group screen I've entered data in these fields:
Title – Enter something that describes this event. In this case the Title is used only to identify this event in the list of Groups in the Tag > Groups section, but I could make it appear at the top of the Group by checking the "Show Title" box.
Group Type – Select the Type for this Group from the second drop-down list. In this case I selected Narrative Panel because I wanted the text to be plain narrative style, and I wanted it to appear in a panel, narrower than the body text, with a contrasting border.
Tag Filter – On the Tag Filter tab, from the Tag Filter drop-down list I chose "Selected." I then scrolled down the list of Tag Types until I found "Resch Note" and double-clicked on the box in front of it to select it.
Exclude – Near the bottom of that screen I clicked the "Exclude from Body Groups" box. Normally one would want each Tag to appear only once. One could insure this by carefully specifying in each Group only those Tag Types that are to appear in that Group, but this would be tedious and error-prone as new Tag Types are added to your Project. The Exclude feature makes it simple to ensure that any one Tag will only appear in the first Group for which it qualifies.
Because of this design generally you should not change the Flag Filter for the main Body Group to "Selected." Typically that Group is processed last, and will include only Tag Types not specified to be in other Groups. Changing its Tag Filter to "Selected" requires you to remember to select any new Tag Types you may create later, or they will be omitted from your site.
On the Narrative Panel tab, I selected the "New Paragraph" Option. Since this is a Panel Group, which would automatically be set off from neighboring text, this would not ordinarily be necessary. But since I use this Tag Type also in TMG reports, the Sentence for it begins with formatting codes to set of the output off this Tag from others in TMG's narrative reports. Checking this option causes any leading formatting, which is not needed in Second Site, to be ignored.
Other types of Panel Groups have other options on their corresponding tabs. Help explains them fully; to access it press the F1 key while the Edit Tag Group screen is displayed.
I want the note created by this Tag to be in a box centered horizontally on the page, so I made the following settings on the Panel Options tab:
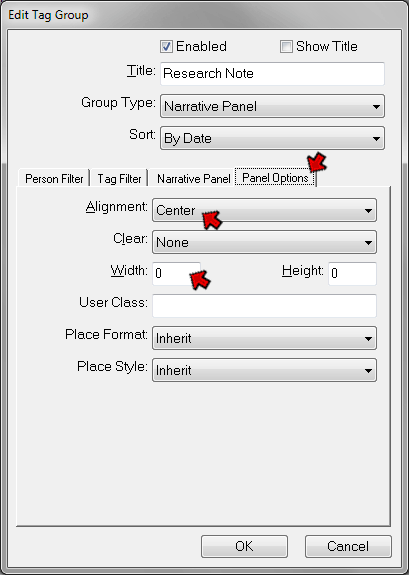
From the Alignment drop-down list I selected "Center." I entered zero in the Width field so that the width of the Panel can be set by the reader's browser. I then adjusted that to 80% of the browser width with styles, as discussed below.
The box around this note and other formatting details were produced by Stylesheet settings, as discussed next.
The appearance of most items in a site created with Second Site is controlled by Stylesheets, as described in my article on Customizing Your Site. This section discusses some specific styles that are useful in modifying the appearance of Tag Groups. There are a group of Styles in the Stylesheets > System > Tag Groups section that apply specifically to Tag Groups, as outlined in the screenshot below:
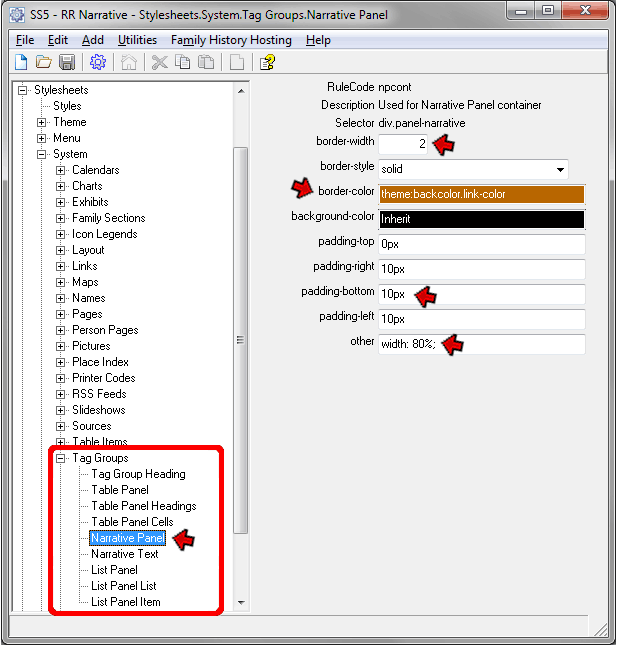
In the example in the preceding section we defined a Narrative Panel Tag Group for research notes tags. This screenshot shows how I modified the styles in the Stylesheets > System > Narrative Panel section to create the appearance shown in the sample output shown above. I made the following changes from the default values:
Border-width – I set to 2 pixels to create the colored border around the panel.
Border-color – I changed the border color to one previously used in my custom-styled site. To do that, I clicked in the border-color field, then pressed F7 to open the color editor. In the editor, I clicked on the Theme tab, and selected one of the colors I had previously used in my site.
Padding-bottom – I entered 10px to create some space between the bottom of the text and the border.
This example illustrates a method of using Tag Groups to create a special section at the top of the People Page section for specific people. In this case, that section provides links to Custom Pages with family background information for the person's family, but the technique would work equally for any other content.
I used Flag Events to create the links. The same result can be obtained with traditional TMG event Tags, but I think using Flag Events is simpler when a lot of people are involved because you do not have to add or remove actual Tags as you add or remove people from the group. Instead you simply change the value of the Flag used to create the Flag Event for each person added or removed. See my Flag Events article for details on how I created the Family Tag used in this example.
The objective was to create a section like that outlined in the example below:
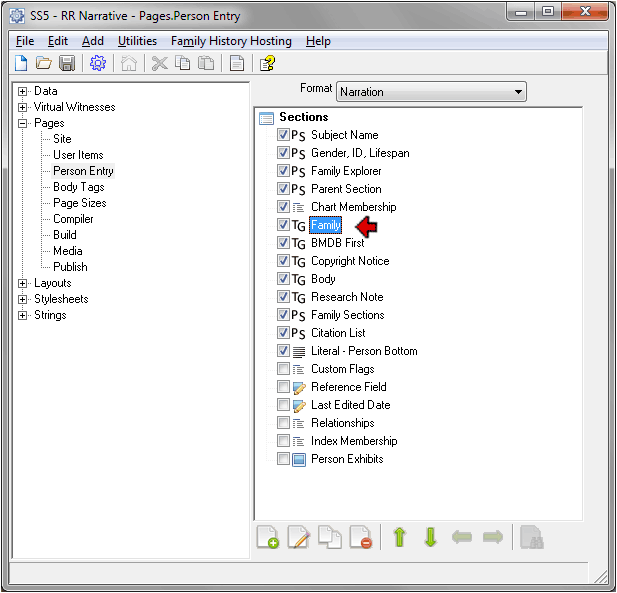
After creating a Flag Event with the Label "Family," as described in my Flag Events article, I created a new Tag Group:
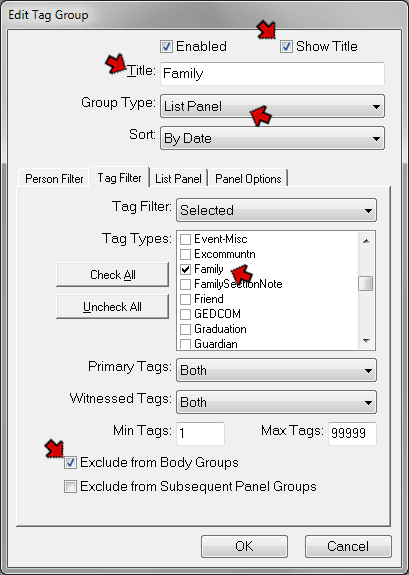
For this application I made the following entries:
Title – A person may have links to more than one family, and I wanted to have the section title appear only once in those cases. So I entered the actual text I wanted to display as the section header as the Title. Otherwise I might have included the section heading in the Tag.
Show Title – I checked this box so the Title would appear on the pages.
Group Type – In this case I selected List Panel as the Type because I'm using a Narration format for my Person Pages, and the parent and charts labels in that Format are arranged in list format. If the best Type isn't apparent, test several until you find the one that works best for your application.
Tag Filter – On the Tag Filter tab, from the Tag Filter drop-down list I chose "Selected." I then scrolled down the list of Tag Types until I found "Family," the Label I applied to the Flag Event when I created it.
Exclude – Near the bottom of that screen I clicked the "Exclude from Body Groups" box so this Tag Type would not appear in any other Groups.
On the Table Panel tab of the same screen I made the following selections:

I set the Item Content to display the Memo from my Flag Event, since that is where I placed the HTML code for the link. For the List Output Type I selected "Person Entry List" since that provides a list where the label in the first column is not repeated if there are multiple Tags in the group, matching the labeling of the "Charts" item, for example.
On the Panel Options tab I made the following entries:
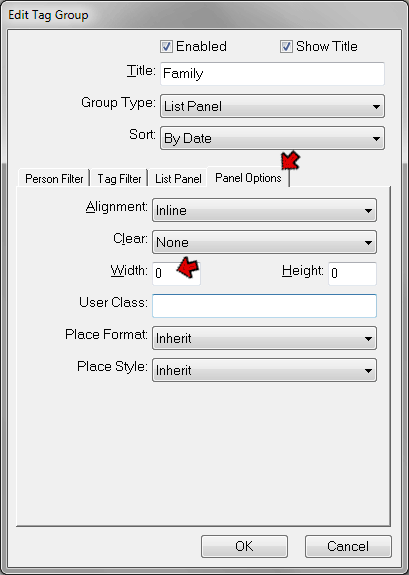
I entered 0 in the width field so the link text will fill the entire width of the page if it is that long.
In order to have the section created by this Tag Group appear at the top of each person's Person Page entry, I moved this item to between Chart Membership and the BMDB First Tag Group in the Pages > Person Entry section. Note that the Research Note Group, described in the first example in this article, is placed between the Body Tag Group and the Family Section so it will appear after all other tags. (I sorted all disabled items to the bottom of the list to get them out of the way.)
The output of the various Tag Groups and other items appear in the Person Pages in the order they appear in this list. You can re-order the items by selecting one and using the green Up and Down buttons at the bottom of the screen, or by dragging them with your mouse.
These setting produce the "Family Background" section shown in the example at the beginning of this example.
These two examples illustrate but a few of the many possibilities that the Tag Group feature offers to customize one's site. Hopefully they will suggest methods that will serve the needs of others.
| ReigelRidge Home | Terry's Tips Home | Contact Terry |
Copyright 2000- by Terry Reigel