This page updated 22 Apr 2014
Version note: Applies to TMG 8 & 9
I find uploading extracts of my data to selected genealogy websites is a useful way to establish contact with other researchers. This article discusses various issues with uploading to such sites and methods for preparing a GEDCOM file to upload. Other aspects of sharing one's data are discussed on my article on Sharing Your Data.
| Topics Included in this Article | |
| Selecting a Site | Best method depends on who we are sharing with |
| Overview | An outline of the process |
| Creating the GEDCOM File | Creating the file to upload |
| Updating Your Tree | Updating your online tree |
| Uploading to Ancestry | Adding a general note to your Ancestry tree |
There are a number of genealogy sites, both subscription and free, where your data can be uploaded and other researchers can find it and potentially make contact with you. I have looked at several of them, but not in depth at most, so will note what I know about each.
I have had an extract of my data posted there for some time and have made some useful contacts in the past. However, usage of the site seems to have fallen off in recent years, I suspect because more heavily advertised sites have become more popular with researchers.
Among the issues I have found with uploading data to an Ancestry tree are 1) there is no way to place a general notice visible on every page with your data, 2) there is no way to create useful advisories about questionable information except to manually access each such person after upload, 3) data entered in Memos is buried in "citations" and unlikely to be found by readers, 4) citations to Ancestry sources are not recognized as such and thus many "hints" you may receive are to sources you have already cited, and 5) there is no way to refresh your tree with updated data except to remove and totally replace it, losing any entries you have added online. A partial solution to the first item is described in the "Uploading to Ancestry" section below.
While you can remove your Tree at any time, if you make it public, which seems to offer the best chance of connecting with other researchers, any other user can copy your information to their own Tree with a simple click of the mouse. This is encouraged by Ancestry, and you are required to agree to it as a condition of posting your data there. My solution to that issue has been to post only basic data that I am willing to have copied. Because of the wide popularity of Ancestry, I'm still experimenting with uploading some of my data there, despite the limitations.
Like all of FamilySearch, access is free. You do have to establish a free account and sign in before using the system.
The process for uploading a file is currently somewhat hidden. Rather than starting from the Family Tree section, you choose the Search section, and then click on "Genealogies." The Submit Tree button is near the bottom of the page. You should probably upload a fairly small number of people at a time because of the review steps required before the data is added to Family Tree. The system analyses the people in your file and classifies them as 1) already in the tree, 2) potential in the tree (questionable because some data differs), 3) new additions, and 4) invalid or living (this will include you, the submitter, which TMG automatically includes in the GEDCOM file). For each of the people in the first category you are asked to decide whether your data or that already entered is better your data, and for those in the second you first decide whether the potential matches are actually the same, then decide whether your data or that already there is better. Don't forget to save any changes you make to the existing data for each person as otherwise it is ignored.
Only birth, marriage, death, and burial data from the GEDCOM file is used; all other events are ignored. Citations and any text in the Memo are also ignored.
A necessary aspect of collaborative system is that all users have the ability to change any of the data. I decline to participate substantively in a project in which users have free reign to modify my carefully researched data, though I have posted to a couple of people I have researched thoroughly which are often incorrectly recorded on the Internet and made a small test to see how uploaded data is treated.
Each person's profile contains several sections, including one containing basic name, birth, death, and family data, a section for DNA analysis, one for comments of other members on the data included, and perhaps the most interesting for those uploading substantive data, a general text section. This last includes a biography and source information from the GEDCOM, which can then be edited. In testing I found that TMG data uploaded quite well to this site, given the limitations of GEDCOM data transfer. The site accepted and displayed the data, including text from Memos, and source information. For a sample of a profile created by uploading see the one for Gideon Dyer Cobb.
Uploading involves steps similar to those described above for FamilySearch
I invite comments from readers about these or other similar sites.
No matter which public sites you choose to upload your data to, a key question is which people, and what data about them, do you include. I choose to include only people known to be not living, and about whom I would be interested in establishing contacts with other researchers. I include only basic birth, marriage, and death information. For more thoughts on this, see my article on Sharing Your Data.
All the sites that I know of allow use of a GEDCOM file for uploading. Some sites also have provision for direct uploads from selected genealogy programs, but none of those work with TMG. So from TMG your only available method is by use of a GEDCOM file. Some of TMG's features are quite helpful in managing the files you create.
The sites differ in how you update your data on them, as discussed in the Updating Your Tree section below. TMG's Flag feature can be a big help in keeping track of who you have posted to the site in and creating a GEDCOM files to submit those updates as required by the site you are using.
The various sites each have their own quirks about how they interpret GEDCOM data, and which data they accept. I recommend making a test with a small group of people to see how a site you are considering deals with the data you want to include before making a major investment in time in the project. Adjust the data you include as required to get the best possible result with that site. Some items you may want to consider, depending on how the site you use treats them:
The sites I've tested utilize the source data differently. Ancestry uses only the contents of the TITL tag, which can include TMG's Title Source Element, as well as several others. But the AUTH (author), PUBL (publisher, date, and others) and NOTE (comments) tags are ignored. Other sites use all the GEDCOM tags, which can cause other issues. For example TMG Exports the Abbreviation into both the ABBR and TITL tags if all of the other Elements which may use those tags are empty. The Abbreviation generally repeats information in the actual Source Elements, often in abbreviated form, and thus is not generally helpful if the importing site is displays it. See the Removing the Abbreviation section below for a method to remove it from your GEDCOM file before uploading if it causes a problem with the site you are using.
The only way to know for sure how your data may appear when uploaded to a particular website is to make a trial upload and examine the results carefully. I have found that including only basic Tag Types generally creates the fewest issues.
Unless you are intending to upload everyone in your Project you need to specify which people are to be included. A good way to do this, particularly if you intend to update your data later, is to create a Flag that marks those included. To create such a Flag, open Flag Manager from the File > Flag Manager menu. Click Add, and enter a Label, for example "Upload." Enter values N,Y for no and yes. N is first so it's the default, and the Flag will be set to N for everybody at the start. You can ignore the Key area or enter a comment about what the Flag is intended for. Click OK or Yes as required to exit back to the main screen.
Next, identify the individuals you want to include in your file by setting the Flag to Y for them. The easiest way to do this is generally with the Secondary Output of the List of People report. If you need help with this, refer to my Filter Tips for suggestions (but remember to substitute the name of your Flag for the Scratch Flag shown in that section).
To generate your GEDCOM file use the GEDCOM Export feature. That feature lets you export selected people by use of the Focus Group, or by selecting them in the Project Explorer. To filter either with your Flag:
| Field | Subfield | Operator | Value | Connect |
| UPLOAD | = Equals | Y | END |
where you substitute the name of your Filter for "UPLOAD." Click OK to close the filter.
Now start the Export wizard from the File > Export menu:
The sites that create collaborative trees have no provision for uploading updated data, though you could create a GEDCOM of new people and upload them, then connect them to the existing people manually online. I have not developed a method for generating a file of only new people, though it is clearly possible to use TMG's Flag feature to do so.
The sites that I know of that produce an individual tree from your data have no provision for updating. You must totally replace your existing tree with a new one. For these sites, when you decide that you have made enough changes in your Data Set to warrant updating your posting, you can create a new GEDCOM file as before. This will generate a new file including the same individuals as before, but reflecting all the changes you made to your TMG Data Set. If you want to add a few people to the file, you can either change their Flag setting manually to Y, or run a List of People report with a filter if that is easier. Adding the Flag to the Add Person screen makes it easy to set the Flag for new people as you add them to your project. See my article on Customizing the Workspace for how to do that.
One common issue when uploading data by GEDCOM file when Sources are included is that TMG Exports the Source Abbreviation, which some sites them include in the source on import. Since the Abbreviation generally repeats information in the actual Source Elements, often in abbreviated form, it is generally not helpful if the importing site is displays it. It is a fairly simple task to remove the ABBR element from the GEDCOM after it is generated as described here.
Note that the ABBR element will also contain data from the Short Title and Short Subtitle Source Element Groups as well. This is not an issue for the standard Source Elements as these are just short versions of information contained in other elements. But it could be an issue if you have used them for custom Source Elements and they contain data not repeated in other Elements.
A simple proceedure I found for removing all the ABBR elements from a GEDCOM file is as follows:
Find what:1 ABBR *^13The astrick is a wildcard meaning any number of characters, and the "^13" is a code for a paragraph mark (the normal code – " ^p " – cannot be used with wildcards).
Make sure the Replace With field is empty.
As mentioned above, there are several issues I have with the way Ancestry.com Family Tree handles uploaded files. One is that text from a TMG Memo is converted to a citation in the tree, and the text itself is so difficult for a reader to find that it is pointless. My solution to that is to exclude all Tag Types that depend on Memo text for their meaning from my GEDCOM.
The second issue is the fact that there is no provision for general note about the entire tree. I have found a way to partially resolve this issue, providing a note as shown in the screenshot of one of my Ancestry Trees below:
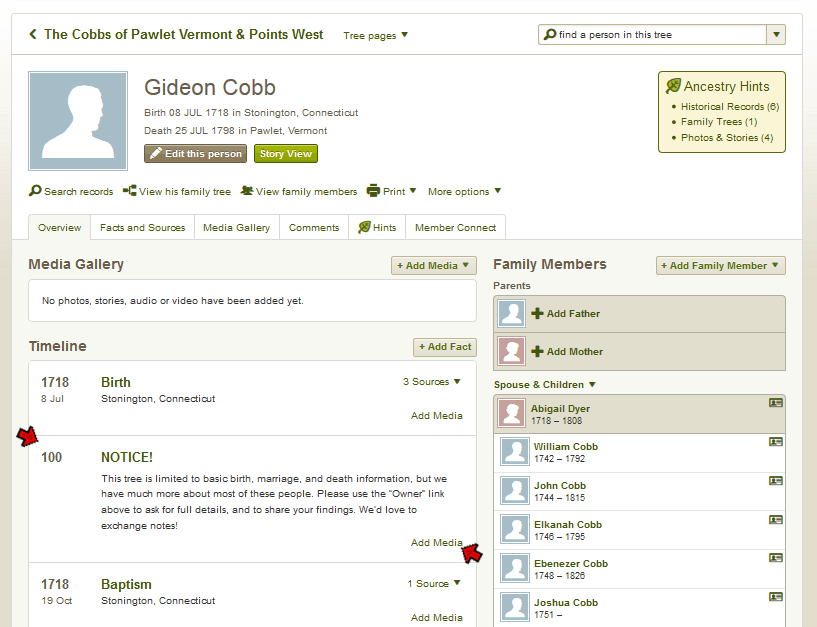
This is not a perfect solution because it only appears in the "Profile" view of the tree, and it is "buried" among the person's events rather than at the top of the page, but in my view it is better than nothing. It cannot be created within TMG, but requires processing the GEDCOM file after it is created with TMG. The procedure I have developed for this is described below.
The objective is to create an "event" for each person in the GEDCOM that the Ancestry Tree upload process will recognize. The GEDCOM "event" that produces the notice shown above looks like this:
In a GEDCOM file each person's entry starts with an "INDI" tag which includes the person's ID#, as show above in red. The three tags below that are what creates the notice: the EVEN tag contains the body of the notice, the TYPE tag contains the event label, and the DATE tag contains the date. TMG will not create such an event so far as I know (I don't even know if this is a "legal" construction under GEDCOM specifications, but it works). So I added it to each person's entry by editing the GEDCOM in MicroSoft Word with these steps:
Find what:INDI^pReplace with:INDI^p1 EVEN This tree is limited to basic birth, marriage, and death information, but we have much more about most of these people. Please use the “Owner” link above to ask for full details, and to share your findings. ^pThis adds most of the notice text to the GEDCOM, but the full text I wanted to use is too long for a single replace operation in Word, so I added the remaining text with another Find and Replace.
Find what:findings. ^pReplace with:findings. We'd love to exchange notes!^p2 TYPE NOTICE!^p2 DATE 100^p
You will likely want to change the text of the notice to something suiting your preferences. The text above is about the maximum amount that the Ancestry Tree import process will accept, so significantly longer text cannot be used. If you made your text short enough you could include the second and third GEDCOM tags in a single find and replace operation, saving a step.
Since WikiTree imports all elements of Sources, you will probably want to use the procedure described above to remove the Source Abbreviation from your GEDCOM file before uploading. I found that removing this element reduced the amount of editing required for sources, but did not eleminate it totally. In particular I found that the Record Type Source Element often duplicates what I have entered in the Title, and the note is better if this is deleted. I also found my gravestone sources benefited from some editing after uploading. Different data entry practices will no doubt cause other types of sources to be less than ideal after uploading.
You might also want to add a general note attached to each person along the lines described above for Ancestry. In doing so keep in mind that the trees on WikiTree are collaborative, meaning that others can modify what you upload. While you remain identified as the "Profile manager" and can control merging of a person with other people thought to be duplicates, all other information about a person can be changed by any other member. So the entry is not really "yours" and any note you add should reflect that. In trying to address these concerns I have created notes like the following which provide links to the person's appearance on my website:
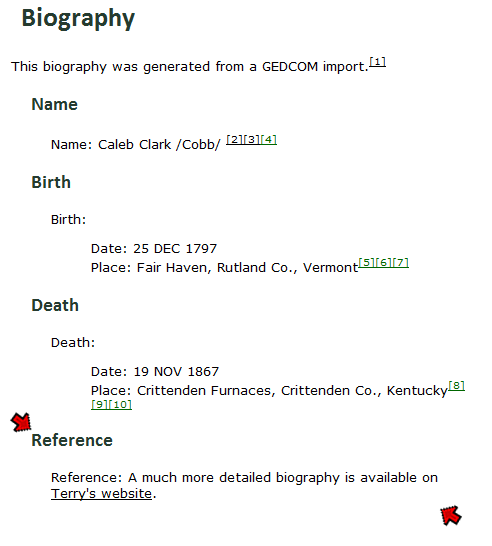
I chose to use the REFN element in the GEDCOM file because it already contains the person's TMG ID# which makes it easy to modify to create a link to the specific person in my website.
The objective is to convert the REFN entry for for each person in the GEDCOM, which looks like this:
to an HTML statement that looks like this:
The first part of the statement is just text, which you might wish to modify as you prefer. The "Terry's website" part becomes the actual text of the link, which you would change to refer to your site. The "http://reigelridge.com/roots/p1596.htm" part is the URL to the Person Page on your site. You must change that to match the details of your site. You can determine what that URL would look like by finding a person in the Person Index of your online site, and right-clicking the name, and choosing "Copy link location" or whatever it may be called in the brower you use.
The proceedure I used to do this is as follows:
Find what:REFN *>Replace with:^&.htm Terry's website]The " *> " item means to "find" the whole line. The " ^& " item tells word to retain what was found and add the remaining text. This adds the last part of the HTML statement. I added the remaining part with another Find and Replace.
Find what:REFNImportant: there must be a space after "REFN"Replace with:
REFN A much more detailed biography is available on [http://reigelridge.com/roots/p
It is not doubt possible to add steps to change to a different GEDCOM tag type and position the note elsewhere by addition of a date element, but this result seemed adequate and is simplier.
| ReigelRidge Home | Terry's Tips Home | Contact Terry |
Copyright 2000- by Terry Reigel